


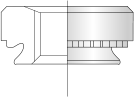
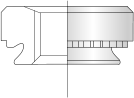
Self-Clinching Fasteners
Broaching Fasteners
Arnold & Shinjo Fasteners
Rivet Bushes
Rivet Nuts
Weld Fasteners
Cage Nuts
Blind Rivets
Inserts for Plastics
Inserts for Stone, Solid
Materials, Composites &
Sandwich Panels
Crown-Nuts
Fast-Con
Installation Equipment
Turned & Cold Formed
special parts made to order
Bespoke fastener design &
development
Fastener & Application
testing
Technical support
ISO 9001
RoHS|WEEE Compliance
REACH Compliance
Conflict minerals
Environmental Policy


SERVICES & SUPPORT


Clinch Nuts
Flush Nuts
Blind Nuts
Miniature Nuts
Nyloc Nuts
Locking Nuts
Floating Nuts
Flush Head Studs
Flush Head Studs for
Stainless Steel
Reduced Flush Head Studs
Thin Panel Non-Flush Studs
High Strength Studs
Thin Panel High Strength
Studs
Flush Head Pins
Flush Head Tapered Pins
Concealed Head Studs
Through & Blind Standoffs
Grounding Standoffs
Thin Panel Standoffs
Quick Release Standoffs
Keylock Standoffs
Concealed Head Standoffs
Flush Panel Screw Assembly
Panel Fasteners
Phillips Head Panel Fasteners
Low-Profile Panel Fasteners
Plunger Assembly
Self-Clinching fastener
Do’s and Don’ts
Self-Clinching fastener
problem solving guides
Self-Clinch in harder panels


NORTHERN PRECISION LIMITED
Specialist Fasteners
+44 (0) 1302 836010
sales@npfasteners.com


Contact us
You can contact us using any
of the methods below.
Unit 3 Durham Lane
Armthorpe
Doncaster
South Yorkshire DN3 3FE
England
+44 (0)1302 836010
sales@npfasteners.com


All rights reserved
© Northern Precision Ltd.
NORTHERN PRECISION LTD
Accreditations
Northern Precision Ltd operate a quality management
system in accordance with ISO 9001.
The ISO 9001 standard is recognised worldwide and
you can be assured of the benefits of working with a
certified company knowing that our management
systems are constantly assessed and approved.

Regulatory
RoHS|WEEE Compliance
REACH Compliance
Conflict Minerals Policy
Environmental Policy
Opening Hours
Mon - Thu
08:00 - 17:00
Fridays
08:00 - 16:30


Registered in England & Wales
Company number 3275391
V.A.T Registration number
GB 684 1384 17


Self-Clinching fasteners provide strong load bearing male or female threads, pins and access hardware in thin
steel and aluminium panels.
Installation is neat and easy, simply locate the fastener into a pre-prepared (punched or drilled and reamed) hole
and apply a parallel squeezing force to embed the fastener into the panel.
Self-Clinching fasteners work by utilizing a special clinch feature. When the part is pressed into the hole, the
parent material is displaced and cold-flows into the clinch feature, effectively locking the fastener into the panel,
providing excellent torque-out and push-out performance.
Self-Clinching fasteners require a parallel squeezing force to be applied for correct installation. Equally important
is the length of time the force is applied. Sufficient time must be allowed for the cold-flow clinching process to
work (this is often referred to as the dwell time when installing on a hydraulic press).
Self-Clinching fasteners CANNOT be installed with a hammer blow as the force would only be applied for about a
100th of a second which is insufficient for the cold flow process to work.
There are so many permutations of fastener type, size, panel material characteristics, hole preparation,
installation and tooling configuration. This is the reason we state that the performance figures given for our
fasteners are offered as guidance only.
To ensure successful installation and achieve the best possible performance from our fasteners we’ve put
together a selection of Do’s and Don’ts so you can avoid some of the common mistakes and pitfalls.
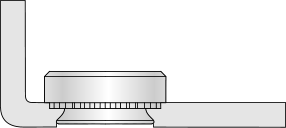
DO
Punch or drill the correct size hole in the panel as specified for the fastener. Install from the punch side of the
panel if possible.
Make sure that the Shank or pilot of the fastener is located squarely in the hole before applying pressure.
Apply a parallel squeezing force.
Make sure the panel is held perpendicular to the Punch / Anvil.
Apply enough force to totally embed the knurling so the shoulder of the nut is squarely in contact with the sheet.
For Studs and Standoffs, the head should be completely flush with the top of the panel. (See installation page for
specific install procedure for non-flush fitting fasteners).
Pay attention to the specified minimum / maximum panel thickness for the fastener you are installing.
Pay attention to the specified maximum panel hardness limit for the fastener you are installing.
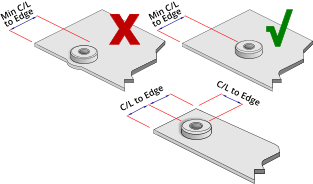
Pay attention to the minimum centreline to edge limit as specified for the fastener you are installing.
Make sure that installation tooling is in good condition and within specification for the fastener you are installing.
Punches and anvils should be made from hardened tool steel. A worn or deformed punch or anvil will result in a
sub-standard installation and poor performance.
DON’T
De-burr or chamfer the hole on either side of the panel - this will remove material that is required during the
clinching process and will reduce performance.
Over-install the fastener - this will distort the panel and depending on the type of fastener possibly result in tight
threads or other fastener damage.
Try to install the fastener with a hammer blow - a sustained parallel squeezing force is required to allow the panel
material to be displaced and cold-flow into the clinch feature.
Install 300 series stainless fasteners into stainless steel. Specify a fastener designed for use in stainless steel.
Install steel or stainless fasteners into aluminium panels before anodising or finishing.
Install the fastener into the pre-painted side of a panel. Performance will be compromised.
Install the screw from the head side of the fastener. You must install from the opposite side of installation.

Do not remove any extra material or
chamfer the hole as this could result in
improper installation or reduced
performance.
PAY ATTENTION TO THE MAXIMUM RECOMMENDED PANEL
HARDNESS WHEN INSTALLING SELF-CLINCHING FASTENERS
Ensure that you are installing into a panel that is ductile and at
or below the published maximum recommended hardness for
the fastener. Hardness figures are shown in HRB (ROCKWELL
HARDNESS B SCALE). Installing in to too hard material will result
in failed installation / poor performance / a damaged fastener.
Ensure that attention is paid to the minimum hole
centreline to edge dimension for each fastener.
Installing too close to an edge or bend could result in
improper installation or reduced performance.
Minimum centreline to edge dimensions shown for
each fastener apply to one edge only. If this distance is
applied on multiple sides there will be significant panel
distortion unless the panel edges are supported during
installation. Any panel distortion will reduce the
amount of material cold-flowing into the undercut and
thread position and performance will be compromised.
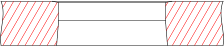
A PUNCHED HOLE SHOWING TYPICAL
SHEAR CHARACTERISTICS
PUNCH SIDE
DIE SIDE
WITH 10% CLEARANCE

ROLL-OVER
ZONE


Ø7.11


Ø7.34

2.30


SHEAR
ZONE
FRACTURE
ZONE
FOR BEST PERFORMANCE IT IS PREFERABLE TO INSTALL
SELF-CLINCHING FASTENERS FROM THE PUNCH SIDE

Tight hole dimension.
Accurate fastener placement.
More material available
to cold-flow into undercut.
Best Performance.


Loose hole dimension.
Inaccurate fastener placement.
Less material available
to cold-flow into undercut.
Reduced performance.
INSTALLING FROM
PUNCH SIDE
INSTALLING FROM
DIE SIDE


Min. C/L to Edge

Bend
Radius


This area of the
panel must be flat
Mounting hole in panel
must be round and in
specification
Remember to allow for installation
tooling clearance
√
X
When installing near a bend, it is important that you
still pay attention to the minimum centreline to edge
dimension for the fastener you are installing.
However, In this scenario it is measured as the distance
from the hole centreline to the outside of the bend
radius.
Failures that occur are different from the the issues
caused by installing too close to an edge. Some
examples are failed installation, poor performance or
the fastener drifting from hole centreline during
installation due to work hardening of the panel at or
near the bend on one side of the hole.
The panel must be flat as shown in the diagram.
Make sure that there is adequate room for the actual
installation tooling.
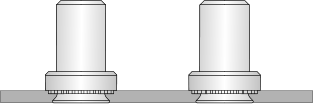
When installing multiple fasteners in the same panel,
they must be spaced far enough apart to avoid
distorting each other’s holes.
Installing too close together can produce distortion,
buckling or stress wrinkling of the panel and it will be
impossible to maintain a smooth flat panel surface.
To determine the minimum required distance between
two or more fasteners, take the minimum centreline to
edge dimension for the fastener you are installing and
add 1/2 the diameter of the second mounting hole.


Fastener hole
size 5.4mm
Min. C/L to Edge
dim. 6.9mm
Fastener hole
size 5.4mm
Min. C/L to Edge
dim. 6.9mm


9.6mm
Min. hole C/L
(6.9 + 2.7)
If you have any questions relating to the correct use of our fasteners or need advice about a particular
application or scenario, please give our sales team a call on +44 (0) 1302 836010, they will be happy to help you
or consult with our technical team for advice or finding a solution for you.
We are always happy to supply samples for testing and application development. For some applications you
can send in your chassis/panel and we can recommend a fastener and carry out installation / testing for you.
A range of common issues, causes and solutions when installing self-clinching fasteners can be found here.
Installing self-clinching fasteners in harder panel materials.
SELF-CLINCHING FASTENERS
DO’S & DON’TS